Goal
Demonstrating how webassembly can be used to obfuscate bot detection techniques
Audience
Red Team
Blue Team
Security Researchers
IoC
For canvas specific the import of wbg_instanceof_CanvasRenderingContext2d. in the wasm file
Disclaimer
This article is written for educational purposes and is intended only for legal penetration testing and red teaming activities, where explicit permission has been granted. If you wish to test any of the scripts provided, refer to the disclaimer.
In the first deep dive of this blog series, we explored how we could pinpoint bots based on the HTTP headers sent to Caddy, with a whopping 99+% filter rate. If you have not read that story yet, you can read more about it over here.
But maybe, the HTTP headers were all in order, and the bots still bypassed our first defence system! Should we let them win? Never! Luckily, there are other interesting techniques that can be used. In this blog we will explore canvas rendering. But because that is pretty noisy and visible, we wanted to obfuscate this technique a bit by making use of WebAssembly!
Let’s first go back to the basics and see how we can make this work. If you don’t know the website yet, browserleaks is a great place for finding leaks based on different browser quirks. Canvas is one of them and can be used to create an identification of a user based on their operating system and an estimate of the browser used.
The GIF below shows the small differences every browser, operating system, graphics card, and installed fonts have on your system (source Browserleaks). All these changes ensure that the HTML5 canvas that is generated results in a different, unique hash that can be used for identification. If you have enough of that information, you can use it to identify potential bots or repeated requests from rotated IPs.
A small gif generated among 35 different users
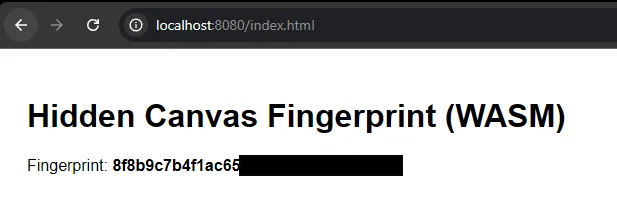
So now that we have some background information, let’s try and make it work in WebAssembly. We start by creating a simple web application, which just shows us our unique fingerprint.
<!DOCTYPE html><htmllang="en"><head><metacharset="UTF-8"><title>Hidden Canvas Fingerprint (WASM)</title><style>body{font-family:sans-serif;padding:20px;}#fp{font-weight:bold;}</style></head><body><h1>Hidden Canvas Fingerprint (WASM)</h1><p>Fingerprint: <spanid="fp">[loading]</span></p><script type="module">importinit,{run_canvas_check}from"./pkg/canvas_fp.min.js";asyncfunctionmain(){awaitinit();consthiddenCanvas=document.createElement("canvas");hiddenCanvas.width=300;hiddenCanvas.height=80;constfp=run_canvas_check(hiddenCanvas);constfpSpan=document.getElementById("fp");if (fpSpan){fpSpan.textContent=fp;}try{constresp=awaitfetch("http://127.0.0.1:8000/fingerprint",{method:"POST",headers:{"Content-Type":"application/json"},body:JSON.stringify({fp,user_agent:navigator.userAgent})});if (!resp.ok){console.error("Failed to send fingerprint:",resp.status);}else{console.log("Fingerprint sent to Python server");}}catch (e){console.error("Error sending fingerprint:",e);}}main().catch(console.error);</script></body></html>
Cool! But as mentioned, there’s an interesting twist, where we are going to make use of WebAssembly instead of using JavaScript. We have decided to make use of WebAssembly because of a few reasons:
The above Rust (WebAssembly) code takes a canvas element from JavaScript and draws an orange rectangle and the same text twice in slightly different locations (the same technique used in BrowserLeaks; of course, this can have other variations). It then converts the final canvas image to a data URL and computes the MD5 hash, which is the fingerprint used. Finally, it clears the canvas again.
Here it is very important to be aware of the function names we define, because these function names will be visible in the imported module from the referenced JavaScript file.
This function above will result in the final build file (even in a release build) containing that function name, revealing that we are trying to perform a canvas check. So before releasing, we should change all function names to arbitrary values.
Building Webassembly
You do need to have a rust project setup with cargo. Which you can find here.
Then we can quickly build the project and see it in action:
This will generate a pkg folder containing the WebAssembly. We can then quickly serve the HTML by making use of Python and verify that it works as expected.
A generated canvas fingerprint with WebAssembly
Perfect, we have a fingerprint. Are we done?
Minifing The Code
No, indeed, we have some JavaScript code and WebAssembly code as a result of building the project. But this still contains lots of information that can be used for analysis, and we want to try and obfuscate it a bit more. For example, we could minify the build:
This is just regular npx functionality to minify the JavaScript, making the JavaScript file harder to read. And wasm-opt optimizes the WebAssembly code by removing debug information, aggressively optimizing it for a smaller file size, and removing producer metadata.
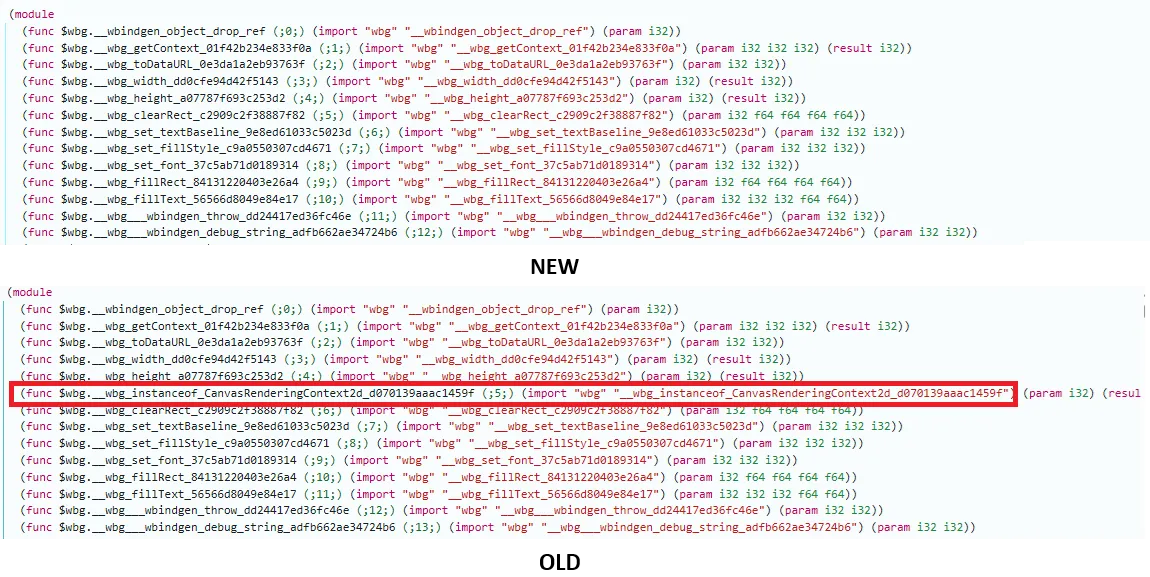
We also looked into a specific line of code where we first used dyn_into, which performs a runtime dynamic cast of the value to our CanvasRenderingContext2d. The use of this function is a clear indicator that we are doing something with canvas rendering, which is something we want to avoid. Because of this dynamic cast, this symbol was stored directly in our Wasm file. With Wasm you can also choose to perform this at build time. This, of course, isn’t type-safe and could result in errors; however, we know exactly what will be stored here, so this removes an IOC (indicator of compromise).
//old method// let ctx = canvas// .get_context("2d").unwrap()// .unwrap()// .dyn_into::<CanvasRenderingContext2d>().unwrap();letctx=a.get_context("2d").unwrap().unwrap().unchecked_into::<CanvasRenderingContext2d>();
Using unchecked_into removes a clear IoC in the wasm file
As we mentioned in the basics, the code performs the same check BrowserLeaks does: rendering a canvas and extracting a hash. However, we don’t want to make it too obvious that this is happening. So we tried to hide the canvas image using three methods:
Off‑screen rendering: the hiddenCanvas is never added to the DOM.
Alpha trick: the text is drawn with near‑zero opacity, so even if you could view it, it is almost non‑existent (rgba(0, 0, 0, 0.01)).
Overwrite after draw: we call ctx.clear_rect at the end to wipe the content.
Because we used WebAssembly as well, it is harder to see that this is happening. Probably the biggest giveaway is that a minified JS file is performing a toDataURL call through WebAssembly. And of course, the creation of the canvas element itself is a good indicator.
Some Scanning Results
Below you can see some examples of what results this can produce in different browsers. We see that, for example, Puppeteer stands out, and that Firefox and Brave also have their own fingerprints. These fingerprints also change between updates, so they are not as stable as JA4H or JA4, which we will cover another time.
Yeah, we know, we know Puppeteer can also alter its code to work around this again! The interesting part with WebAssembly and using canvas directly, instead of using an image with a specific size, is that the HTMLCanvasElement.toDataURL type is empty. This makes it a bit harder to bypass than normal canvas validations.
However, below you’ll find a small piece of code that can be used to alter your fingerprint. Of course, you should always use a fingerprint that is common.
awaitpage.evaluateOnNewDocument(()=>{constmainFunction=HTMLCanvasElement.prototype.toDataURL;HTMLCanvasElement.prototype.toDataURL=function (type){// check if this is a fingerprint attemptconsole.log("Canvas toDataURL called with type:",type);if (type==''){// return fake fingerprintreturn'data:image/png;base64,idwadwaawdfgawgadwdawkMtlkQ24YDwP8+FZkI+gY3uq2cVI3vLA2cWAW86Qy8BwQ5Ek/WK/JBgqC72UTvJakmY5lAvurTRPSDrMmKRRcIvgeUo2KmmEI86Qy8DwmVu/ezQIBCSBLzwjKZhujv5cZZmUNkAq57ekRXCLYDG12pre5Qy5DAzDXbPfIOB/JqmCzNafCZd+dMA5RfZxdsBlNTAMF+FJfD2eSvSI0iGpmXe5GnbG3qyyHAO3yCZxlGV2uBLWDcJVMZKc7UrnfIBvQI+pHpxbS34ZaNkK7gYN0yvTDSCXyCZxNJTscFFe/DUH1w3QvpnzPiUPdTXfsvxZDdBGmeQU2SQd9lWQHS5m9J6Ln4/suZCwc96D25qM1formq5/3ApOX1uDkZ7P7JXkENkkK5eqQm3flRtuvitSYgCucKOf0zv01bazcG3Tyz8GKukvSjjrlB3/U5Rw42dqAo29yypKOO8figeX1/gH+zX9JqfOeUwAAAAASUVORK5CYII=';}// otherwise, just use the main functionreturnmainFunction.apply(this,arguments);};});
So, enough for this blog; hope we’ll catch you in the next one!